Testing Colors (p.31)

Whether you are using paints out of a tube, dyes out of a jar or polymer clay out of the package it helps to test your colors before starting to mix them together. Testing can answer many questions. For example, it can tell you the bias – is the green lime or emerald? It can tell you the saturation – is the green clear or muddy? It can tell you the mixing strength – is it a bully or a wimp? The exercises in the book are designed for polymer clay artists but can be adapted if you are using inks, dyes or paints. If you are not using polymer clay, be sure to also test for transparency and staining characteristics.
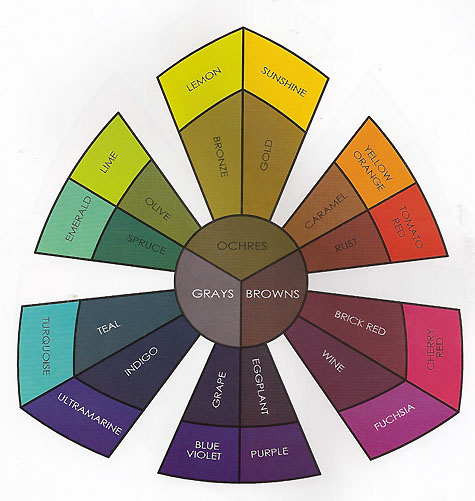
A New Color Diagram
After playing with many versions of triangular and circular color diagrams, I decided to design a hybrid Color Sorter specifically for the book. I called the primaries Yellow, Blue and Magenta and divided them each into two variations.
I have argued for years that Cyan should replace Blue as a primary, but I did not include the color Cyan on the new sorter for two reasons: #1. During my many years of teaching color workshops, I found that hardly anyone – even the most computer savvy students – could accurately pick out Cyan from a pile of swatches, and #2. Since all full saturation blues will mix with a magenta color to get clear purples and the same blues will mix with yellows to make greens, its just not that important to find the perfect blue primary. (Sacrilege, I know!)
On the other hand, unlike blues, your choice of a “red” primary is critical when mixing colors. I wanted to show that Magenta colors – like Fuchsia and Cherry Red – are primaries and that orange reds (we named them Tomato Reds) – like Scarlets and Cadmium Reds – are secondaries that come from mixing Magentas and Yellows. If you use a tomato red you will never get a clear purple no matter which blue you use.
If you have ever taken a workshop with me, you know how much I love mud colors. I think its important to understand that mud colors can be sorted depending on which of the primary color families they come from. Ochres come from colors with lots of yellow in them, grays from colors with lots of blue, and browns have a high proportion of magenta.
Weekend Extra Exercises
1. Look at the sorter on page 138 and sort all your “reds” into either the Tomato Red or the Magenta section. Mix a “tomato red” clay half and half with a blue clay and then mix a “magenta” clay half and half with the same color of blue clay and see what you get.
2. One of the reasons to do test mixing with white is to see the “bias” of the package color. Pick one of the hue families that you have many different variations of package colors and make test mixes of each one. Take some time to compare the tinted version with the out-of-the-package colors.
3. Make an enlarged copy of each of the Color Sorters on page 133 and 134 and laminate them. As you are making your package color test samples, sort the clay into one of the color sorter sections. Most of the package colors will usually fall on the Classic Sorter and the tinted versions will usually fall on the Pastel Sorter. (Studio by Sculpey colors are the exception. Many of their package colors are pastels.) If you are not sure about a color just put it between the sections that seem closest to the color.
4. As you are sorting your samples, note your instinctive reactions to the color names that Lindly and I gave to each section. Do you agree or disagree with our choices? Everyone has different reactions to color names. Feel free to rename the sections whatever pops into your head. I am very curious about what names you would change – especially if you have a strong negative reaction to our names – and encourage you to send in your preferred names in the comment section.
TIPS

Label an index card with all the package colors you plan to test beforeyou start mixing and then bake the finished samples on the card.
If you want to put magnets on your samples, sheet the clay at the middle setting instead of the thickest setting so that the test mixes will weigh less.
Sheet a large sheet of white if you plan to make lots of test mixes.
Put your package colors into three piles as you finish each test mix with white. Make one pile the “Wimps” for the colors that turned very pastel. Make another pile the “Bullies” for colors that did not shift very much when mixed with the white. In between put all the other colors. Remember which are the wimps and which are the bullies when you mix colors from now on!
FAQ’s
1. Why do we use cutters? Using the cutters on sheets of clay run at the same thickness in the pasta machine is as close as you can get to mixing exactly equal parts.
2. What should I do if I don’t have a 3/4″ square cutter? You can make your test samples with any cutters you have on hand – just make the out-of -the-package sample piece large enough to hold the tinted version of the package color mixed half to half with white. Experiment with your cutters to see what sizes work best for you.
3. Can I use any brand of white clay? No. Since some of the clays now have very different baking temperatures, be sure to only use a white clay with a baking temperature that is the same as the clay you are testing.
4. What did you use to stamp the initials of the brand of clay into the test mix samples? I made “chops”. I incised the initials into a sheet of raw clay, baked it and then used it as a plate to make the reverse initials. I cut out the reverse initials after baking and glued them to the end of pieces of scrap clay.

There’s quite a bit to absorb in the first few chapters. Just have fun playing with the exercises and don’t worry about doing them “right.” No matter how much you know about color, picking up the clay and doing some test mixes will teach you something new!